3-Legged OAuth2.0 flow step by step
Published: February 15, 2021
Before starting
Authorization by code
Authorization by refresh token
Access protected resources using OAuth access token
List of errors
Before starting
In order to call our API, you will need credentials for your client application: they are used by the back-end platform to identify your client application and allow it to make calls to the APIs. You will receive these credentials when you register your client application on the Orange Developer portal.
At the end of this registration process, you will be provided with:
- a
client_id: a unique ID provided by the Orange back-end server to identify your client application, - a
client_secret: it is used to sign/encrypt the requests and must be shared by the client and server,
The client_id and client_secret are used to specify the authorization_header.
Its value is composed of the keyword “Basic”, followed by a space and the base64 encoding of the concatenation of your client_id, “:” and your client_secret.
In Javascript, the authorization_header will look something like:
authorization_header = Basic + btoa(client_id + ":" + client_secret)
This information is available on your application’s page when you are logged-in on the Orange Developer portal.
Orange APIs access is granted thanks to access token. We are using the following types of authorization based on OAuth 2.0 standard:
– Authorization by code (aka three-legged OAuth)
– Authorization by refresh token
The Authorization Code and Refresh Token OAuth flows follow the following steps:
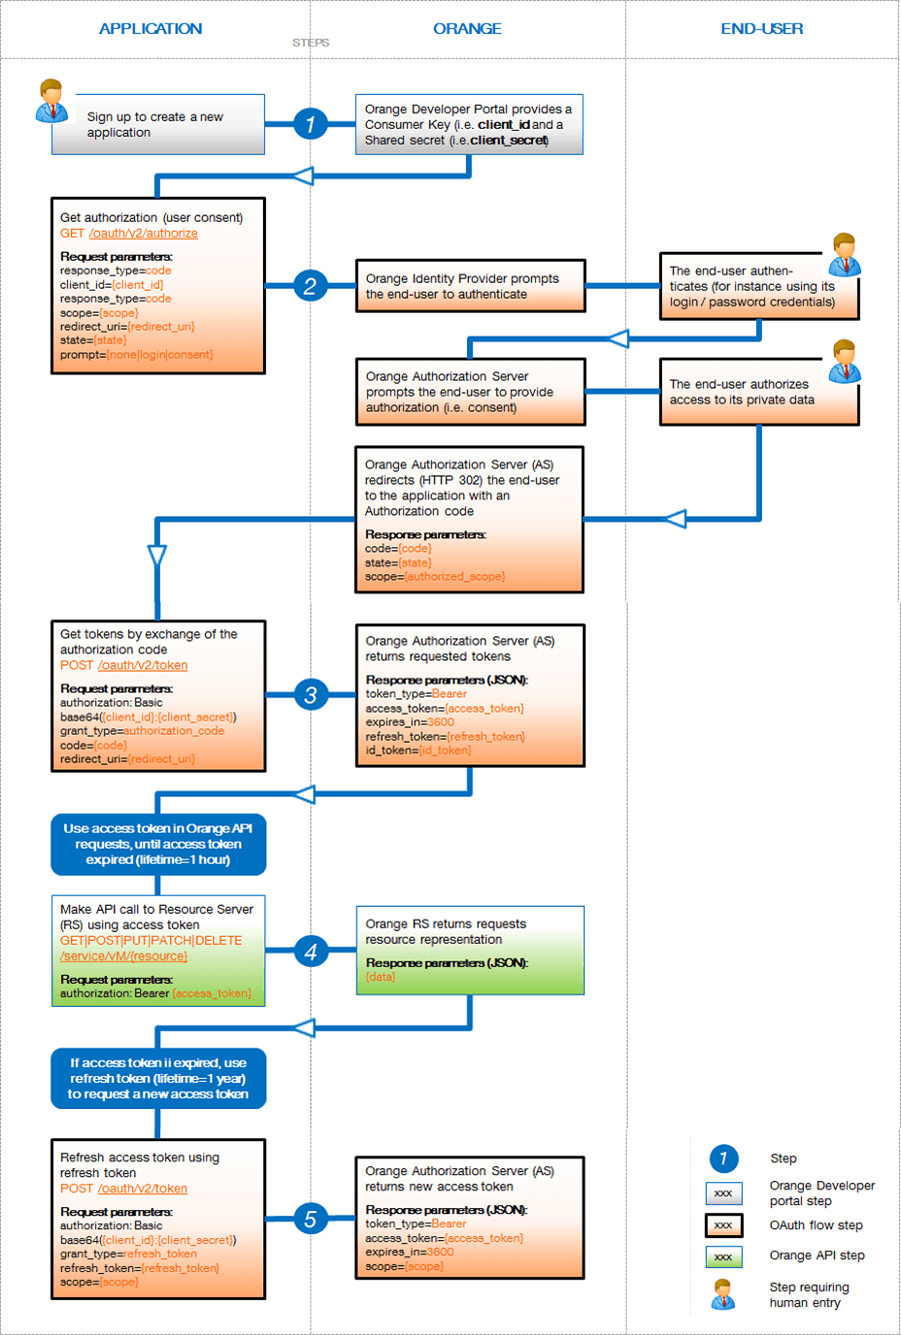
WARNING: OAuth 2.0 authorization protocol requires the use of HTTPS for exchanges between the client and the Orange Authorization Server due to the sensitivity of the data (for instance, app’s credentials – i.e. client_id, client_secret, ID token, access token, refresh token, authorization code).
Authorization by code
The Authorization Code grant type is used by a client application when the final user of the service is requested to give their consent in order to authorize this client application to access their resources.
This authentication process is based on OpenID Connect (OIDC), a simple identity layer on top of the OAuth 2.0 standard. You do not need to have specific knowledge about OIDC standard, but you can find out further details via these official pages or via this tutorial.
Step 1: Request the OAuth authorization code from the user
This is the first step in your client application. You need to let the user authenticate himself/herself in order to be able to access his/her data. Once done, your client application will be able to make calls to our APIs.
To authenticate the end-user and obtain his/her consent, a GET request must be sent to the authorization endpoint by adding the following mandatory parameters:
response_type(required): the response type. Fixed: code.client_id(required): the unique ID provided by Orange to identify your client application.scope(required): the API scope your client application needs. It tells the Authorization endpoint what kind of permissions to ask for when displaying the consent form to the end-user. Use space as separator if more than one value.redirect_uri(required): the callback URL you provided for your client application during registration. Note that it is mandatory for security reasons.state(required): a free parameter you can use to set some data. This field will be sent back in thestatequery-string parameter when redirecting to your callback URL.
Additional optional parameters can be added to the Authorization request:
prompt(optional): you can set this parameter in case you want to force the login and/or the consent page display. It can be useful if for example, your terms have changed and you want the end-user to revalidate the consent page. Multiple values must be separated by a url-encoded space (%20). Possible values:
none: no UI will be displayed. If the end-user is already authenticated and consent has been accepted, the redirection to your callback URL is done with a valid code parameter. If the end-user is not authenticated, or consent is needed, the redirection to your callback URL is done with a login_required error. It can be useful to silently check existing authentication or consent.login: force the connection page display. If the end-user is already authenticated, a page will ask him to confirm the use of his identity to proceed further.consent: force the consent page display. If the end-user is not already authenticated, the login form is displayed first.
display(optional): string value to specify the user interface display for the Authentication and Consent flow. The values can be:
page: default value, if the display parameter is not added. The UI should be consistent with a full page view of the User-Agent.popup: the popup window should be 450px X 500px [wide X tall].touch: the Authorisation Server should display the UI consistent with a ‘touch’ based interface.wap: The UI should be consistent with a ‘feature-phone’ device display.
nonce(optional): String value used to associate a client session with the ID Token. It is passed unmodified from Authorisation request to ID Token. The value should be unique per session to mitigate replay attacks.ui_locales(optional): space separated list of user preferred languages and scripts for the UI as per RFC5646.login_hint(optional): an indication to the IDP/Authorisation Server on what ID to use for login, e.g. emailid, MSISDN (phone_number), etc.acr_values(optional): Authentication Context class Reference. The acr_values are an indication of the authentication method to be used by the Identity provider (IDP). The authentication methods to be used are linked to the LOA (Level Of Assurance) value passed in the acr_values. The IDP configures the authentication method selection logic based on the acr_values. Space separated string that specifies the LOA values to be used during authentication processing. The values appear in order of preference. The recommended values are the LOAs as specified in ISO/IEC 29115 Clause 6.
At the end, you need to access the following URL in a Web browser or in a toolkit WebView:
https://api.orange.com/openidconnect/fr/v1/authorize?response_type=code
&client_id={client_id}
&scope={scope}
&redirect_uri={your_application_callback}
&state={your_state}
NOTE: When using end-user’s semi-implicit authentication on mobile, you need to request the following Authorization endpoint using HTTP protocol. As an example:
http://openid.orange.fr/oidc/authorize?scope=openid
&response_type=code
&client_id=6KRHymujFP8s...j2k1Ee6a8SG2g
&state=upToYouData
&redirect_uri=https%3A%2F%2Fwww.myserver.com
&charset=utf8
NOTE: Remember that you need to specify the
client_idandredirect_urivalues you got or provided during the registration process.
For security reasons, you can only use the value specified during the registration process for theredirect_uriparameter.
Note the special encoding forredirect_urivalue: it must be url encoded (e.g. “://” has to be replaced by “%3A%2F%2F”)
As an example:
https://api.orange.com/openidconnect/fr/v1/authorize?scope=openid%20profile
&response_type=code
&client_id=6KRHymujFP8s...j2k1Ee6a8SG2g
&state=upToYouData
&redirect_uri=https%3A%2F%2Fwww.myserver.com
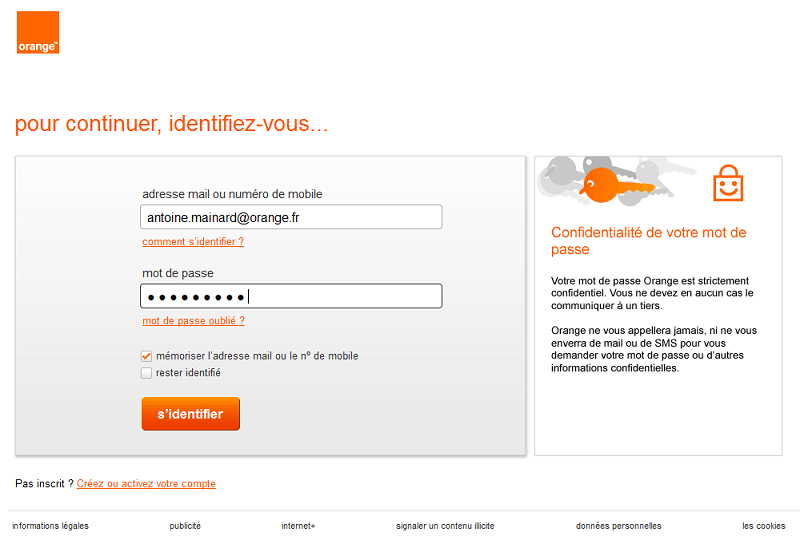
This URL displays a web page that takes care of authenticating the user.
As an example:
Then, the end-user will be asked to give his/her consent for using the service.
As an example:
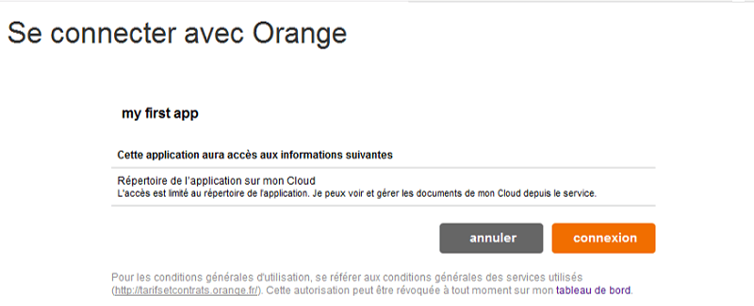
NOTE: Orange Authorization Server allows end-users to manage consents given to client applications. A consent may be revoked at any time by the end-user.
Once this is done, the redirect URL is automatically called back with the following query-string parameters:
code(required): the authorization code you will use with the token endpoint.state(required): the value you gave when calling the Authorize endpoint (i.e.statequery-string parameter).scope(optional): the scope is set in case the required scope is not entirely authorized. It then contains the actual authorized scope (which thus is a subset of the requested scope).
NOTE: The
codeis valid for a short time. At the present time,codehas a lifetime of about 10 minutes.
As an example:
http://www.myserver.com/?code=OFR-908cb0277a7e3d358c39d0792750875e...f4139a840cdcb6e&state=upToYouData
You can now exchange the obtained code (OFR-908cb0277a7e3d358c39d0792750875e…f4139a840cdcb6e in the example) to get OAuth 2.0 tokens (i.e. access_token, refresh_token and id_token).
Step 2: Request the OAuth access token by exchanging the OAuth authorization code
The access_token is mandatory for API calls to protected resources. Additional tokens may be issued by the Orange Authorization Server if requested using suitable scope. To get these tokens, a POST request must be sent to the token endpoint by adding the following parameters using the “application/x-www-form-urlencoded” format:
authorization_header(required): the credentials of your client application (i.e. client_id/client_secret). See Before starting section.grant_type(required): the authorization grant type. Fixed: authorization_code.code(required): the code you received in the callback request (i.e.codequery-string parameter) after calling the Authorization endpoint.redirect_uri(required): the same callback URL you provided for the Authorization request. Note that it is mandatory for security reasons.
curl -X POST
-H "Authorization: {authorization_header}"
-d "grant_type=authorization_code&code={authorization_code}&redirect_uri={redirect_uri}"
https://api.orange.com/openidconnect/fr/v1/token
NOTE: In the body part of the request, be sure to use the
authorization_codeyou have just received and do not forget to provide theredirect_uri.
As an example:
curl -X POST
-H "Authorization: Basic NktSSHljksdj7P...Jjndb6UdnlrT2lOaA=="
-d "grant_type=authorization_code
&code=OFR-908cb0277a7e3d358c39d0792750875e...f4139a840cdcb6e
&redirect_uri=https%3F%2F%2Fwww.myserver.com"
https://api.orange.com/openidconnect/fr/v1/token
a/ If the transaction succeeds
On success, the HTTP response status will be set to 200 OK, and the body will be a JSON object containing the following fields:
token_type(required): the token type. Fixed: Bearer.access_token(required): the access token to be used with each of your API calls, by setting the header as follows: Authorization: Bearer {access_token}.expires_in(required): the token validity in seconds. It is the expiration time of the access token in seconds from the time of generation of the response.refresh_token(optional): the refresh token to be used to refresh an access token. It is generated only if requested through the ‘offline_access’ scope and authorized for your client applicationid_token(optional): the id token (JWT format) which contains information for identity federation and user authentication. It is generated when the ‘openid’ scope is requested.
At the end, you should receive JSON data similar to:
HTTP/1.1 200 OK
Content-Type: application/json
{
"token_type": "Bearer",
"access_token": "OFR_6KRHymujFP8s...j2k1Ee6a8SG2g_84228a532da9ab133f97f8ac1916d...dce51cc1dab95d12c",
"expires_in": 3600,
"refresh_token": "OFR-47bdf45f66b6b055971a04e3826dd516f30d10c...800c0844855f2c5defac6", (optional)
"id_token": "eyJ0eXAiO...UzI1NiJ9.eyJpc3MiOiovL...mFjciI6MH0.zJFKrzdNa2aE38X...jw8HfY" (optional)
}
From now, you can use this access_token for all subsequent API calls to protected resources (see Access protected resources using OAuth access token section for further details).
NOTE: The
access_tokenis valid for the duration, in seconds, specified byexpires_in. Therefore, you do not need to request a new access_token as your client application doesn’t receive an error indicating that your access token expired.At the present time,
access_tokenhas a lifetime of 1 hour.
When expired, the access_token can be renewed using the refresh_token (see Authorization by refresh token section for further details).
NOTE: The
refresh_tokenis valid for the given period of time.
At the present time,refresh_tokenhas a lifetime of 1 year.
b/ If the transaction fails
If you provide invalid client_secret for example, you will get an error with JSON data similar to:
HTTP/1.1 401 Unauthorized
WWW-Authenticate: Basic realm="Authorization Required"
Content-Type: application/json
{
"error": "invalid_client",
"error_description": "Invalid client password"
}
See List of errors for further details.
Authorization by refresh token
Refreshing an OAuth access token
If our Authorization server have issued a refresh token to your client application, and if you need a new access_token for your client application, a POST request must be sent to the token endpoint by adding the following parameters using the “application/x-www-form-urlencoded” format:
authorization_header(required): the credentials of your client application (i.e. client_id/client_secret). See Before starting section for further details.grant_type(required): the authorization grant type. Fixed: refresh_token.refresh_token(required): the refresh token issued to your client application.scope(optional): the requested scope (if omitted, it is treated as equal to the scope originally granted when the refresh token was issued ; if included with an invalid scope, the scope that have been originally granted by the end-user is returned).
curl -X POST
-H "Authorization: {authorization_header}"
-d "grant_type=refresh_token
&refresh_token={refresh_token}
&scope={scope}"
https://api.orange.com/openidconnect/fr/v1/token
As an example:
curl -X POST
-H "Authorization: Basic NktSSHljksdj7P...Jjndb6UdnlrT2lOaA=="
-d "grant_type=refresh_token
&refresh_token=OFR-47bdf45f66b6b055971a04e3826dd516f30d10c...800c0844855f2c5defac6
&redirect_uri=https%3F%2F%2Fwww.myserver.com
&scope=openid%20cloud"
https://api.orange.com/openidconnect/fr/v1/token
a/ If the transaction succeeds
The Orange Authorization Server issues an access_token and constructs the response by adding the following parameters to the entity-body of the HTTP response with a 200 (OK) status code:
token_type(required): the type of the token issued. Fixed: bearer.access_token(required): the access token issued by the authorization server, and to be used for your API calls, by setting the header as follows: Authorization: Bearer {access_token}.expires_in(required): the lifetime in seconds of the access token.scope(optional): the scope that have been originally granted by the end-user.
At the end, you should receive JSON payload similar to:
HTTP/1.1 200 OK
Content-Type: application/json
{
"token_type": "Bearer",
"access_token": "OFR_6KRHymujFP8s...j2k1Ee6a8SG2g_d1d3cd43319e63615f836d3ad130d...73f257a401127064a",
"expires_in": 3600,
"scope": cloud
}
From now, you can use this new access token for all subsequent API calls to protected resources (see Access protected resources using OAuth access token section for further details).
NOTE: The
access_tokenis valid for the duration, in seconds, specified byexpires_in.At the present time, the
access_tokenhas a lifetime of 1 hour.
b/ If the transaction fails
Because you provide invalid client_id for example, you will get an error with JSON data similar to:
HTTP/1.1 401 Unauthorized
WWW-Authenticate: Basic realm="Authorization Required"
Content-Type: application/json
{
"error": "invalid_client",
"error_description": "client not found"
}
See List of errors for further details.
Access protected resources using OAuth access token
In order to call our API, the access_token is mandatory. The bearer token must be provided in the request using HTTP Authorization header.
curl -X GET
-H "Authorization: Bearer {access token}"
https://api.orange.com/{api}/vM/{resource}
As an example:
curl -X GET
-H "Authorization: Bearer OFR_6KRHymujFP8s...j2k1Ee6a8SG2g_d1d3cd43319e63615f836d3ad130d...73f257a401127064a"
https://api.orange.com/openidconnect/v1/userinfo
If your client application attempts to use an expired or revoked access_token, an invalid token error will be returned.
Error management with access token
There are some cases where your client application will no longer gain access to API resources, and get an error back.
Please check the following points:
- You attempt to use an expired or revoked
access_tokenand you get an invalid token error. You will have to request a newaccess_token(as explained in Step 1). As an example:
HTTP/1.1 401 Unauthorized
Content-Type: application/json
{
"code": 41,
"message": "Invalid credentials",
"description":"access token resource OFR_6KRHymujFP8s...j2k1Ee6a8SG2g_d1d3cd43319e63615f836d3ad130d...73f257a401127949b not found"
}
- The end-user removed the authorizations for your client application. As an example:
HTTP/1.1 401 Unauthorized
Content-Type: application/json
{
"code": 41,
"message": "Invalid credentials",
"description": "no consent has been found"
}
- You cancelled your subscription to the API so that the capability to generate an
access_tokenis no longer allowed. As an example:
HTTP/1.1 403 Forbidden
Content-Type: application/json
{
"code": 50,
"message": "Access Denied",
"description": "The application that makes the request is not authorized to access this endpoint (ex: not a subscribed service)."
}
- Orange administrators have suspended your access (as a consequence of the non-fulfilment of conditions of use for example).
List of errors
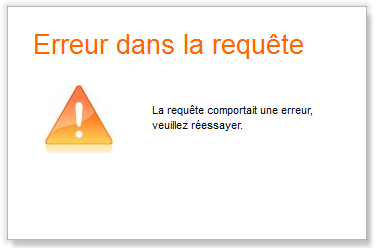
When calling the Authorize endpoint
If an error occurs due to a missing or invalid client identifier or if the redirect URL is invalid, the Orange Authorization Server will display a generic error page (HTML page). As an example:
In any other error cases, the Orange Authorization Server will redirect the end-user back to the provided “redirect_uri” (HTTP 302 redirection) with the following query-string parameters (each parameter value being URL encoded):
error: The error type:
- access_denied: the end-user cancelled the consent form.
- consent_required: the user has never accepted the Terms Of Service, you have to send the request again without prompt=none so the UI sequence is processed.
- invalid_scope: the given scope does not match the known one, or scope value cannot be understood.
- invalid_request: a required parameter is missing in the request, or a parameter value is unknown.
- login_required: the user is not authenticated; you have to send the request again without prompt=none so the UI sequence is processed.
- unsupported_response_type: response_type value is not supported. Fixed value: code.
- server_error: an internal server error occurred and the request can not be fulfilled.
- temporarily_unavailable: the request could not be currently handled.
error_description: a brief description of the error. Typical example: consent%20denied in the case the end-user did not give their consent to your client application for the required operations (as set in thescopequery-string parameter).state: the value you gave in the Authorization request (state parameter).
As an example:
HTTP/1.1 302 Found
Location: {callback_uri}?error=access_denied&error_description=consent%20denied&state={state}
Below the list of possible errors (non exhaustive):
| Error | Error description | |
|---|---|---|
| access_denied | consent denied | |
| invalid_scope | scope value cannot be understood | |
| invalid_request | syntax error | |
| invalid_request | invalid prompt value | – |
| unsupported_response_type | unsupported response type | |
| consent_required | prompt none | |
| login_required | The Authorization Server requires End-User authentication | |
| server_error | The authorization server encountered an unexpected condition that prevented it from fulfilling the request |
When calling the Token endpoint
Below is a list of errors (non exhaustive) that your client application can get when calling the token endpoint of the Orange Authorization Server.
The following list of errors fully complies with OAuth 2.0 specification. See [OAUTH] for further details.
| HTTP Status | Error (mandatory) | Error description (optional) | |
|---|---|---|---|
| 400 | invalid_request | The URI does not support the requested method | |
| 400 | invalid_request | The requested URI or the requested resource does not exist | |
| 400 | invalid_request | One or more required query-string parameters are missing | |
| 400 | invalid_request | Syntax error | |
| 400 | invalid_grant | The parameter grant_type is not valid | |
| 400 | invalid_grant | Invalid authorization code | |
| 400 | invalid_grant | Invalid redirect_uri | |
| 400 | invalid_grant | The provided authorization grant (e.g., authorization code, resource owner credentials) or refresh token is invalid, expired, revoked, does not match the redirection URI used in the authorization request, or was issued to another client | |
| 400 | unauthorized_client | The application that makes the request is not authorized to access this endpoint (ex: not a subscribed service) | |
| 401 | invalid_client | The requested service needs credentials, but none were provided | |
| 401 | invalid_client | The requested service needs credentials, but the ones provided were invalid | |
| 401 | invalid_client | The requested service needs credentials, and the ones provided were out-of-date | |
| 401 | invalid_client | Client not found |
As an example:
HTTP/1.1 400 Bad Request
Content-Type: application/json
{
"error": "invalid_request",
"error_description": "missing redirect_uri parameter"
}
Common errors
Additional errors may occur when requesting our APIs. For instance, when the rate limit defined for an API is exceeded.
In that case, you should receive JSON payload similar to:
As an example:
HTTP/1.1 403 Forbidden
Content-Type: application/json
{
"code": 53,
"message": "Too Many Requests",
"description": "The application has made too many calls and has exceeded the rate limit for this service."
}
See API Reference sections for the full list of common errors.
References
- [OAUTH] Hardt, D., “The OAuth 2.0 Authorization Framework” RFC 6749, October 2012.
- [JWT] M. Jones, J. Bradley and N. Sakimura, “JSON Web Token (JWT)” RFC 7519, May 2015
- [OIDC] “Welcome to OpenID Connect”
- [OIDC_CORE] N. Sakimura, J. Bradley, M. Jones, B. de Medeiros and C. Mortimore, “OpenID Connect Core 1.0”, November 2014
- [JSON] “Introducing JSON”